Beyond the fault code, a drive provides a wealth of live diagnostic
information through its own meters and monitors, and using this
information is one of the most powerful techniques in drive
troubleshooting. The drive continuously measures its currents, voltages,
temperatures, and other quantities, and displays them — so the
technician can watch what is actually happening inside the drive, in
real time, while it operates. Understanding how to use these built-in
diagnostics turns the drive into its own most powerful diagnostic
instrument.
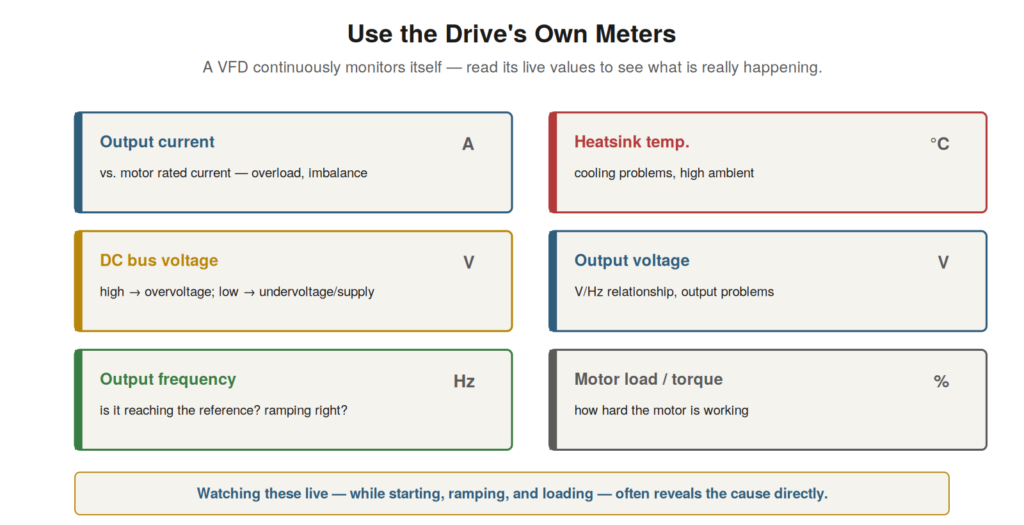
voltage, output frequency, heatsink temperature, output voltage, and
motor load. Watching these live — while starting, ramping, and loading —
often reveals the cause directly.
The drive’s live meters
A drive displays a range of live measured values that are invaluable
for diagnosis. The output current shows how much current the motor is
drawing, comparable to the motor’s rating to judge loading and
imbalance. The DC bus voltage shows the state of the drive’s core,
revealing overvoltage and undervoltage conditions and their development.
The output frequency shows whether the drive is reaching the commanded
speed and ramping correctly. The heatsink temperature reveals cooling
problems and overheating. The output voltage shows the voltage supplied
to the motor, relevant to the volts-per-hertz relationship. The motor
load or torque shows how hard the motor is working. These live values,
displayed by the drive, let the technician see the drive’s actual
operation directly. Understanding what these meters show — current, DC
bus voltage, frequency, temperature, output voltage, load — is the basis
for using them in diagnosis. Rather than inferring what the drive is
doing, the technician can read these values directly from the drive,
seeing the actual currents, voltages, and temperatures. Understanding
the drive’s live meters — what each shows and what it reveals — equips
the technician to use the drive’s own continuous monitoring as a
diagnostic tool, reading directly what is happening inside the drive as
it operates, which is far more informative than external inference and
is one of the drive’s greatest diagnostic advantages.
Watching values during operation
The real power of the drive’s meters comes from watching them during
operation — while starting, ramping, and loading the drive — because the
values’ behavior reveals the cause of many faults. A fault that occurs
during acceleration can be diagnosed by watching the current during
acceleration (does it spike, indicating too-fast a ramp or a fault?). A
fault during deceleration can be diagnosed by watching the DC bus
voltage during deceleration (does it climb, indicating regeneration?).
An overtemperature fault can be understood by watching the heatsink
temperature rise. A loading problem can be seen by watching the current
as load is applied. By watching the relevant values as the drive
operates through the conditions that cause the fault, the technician
sees directly what happens — the current spiking, the voltage climbing,
the temperature rising — which reveals the cause. Understanding this
technique — watching the drive’s live values during the operating
conditions that trigger the fault — is the most powerful use of the
drive’s diagnostics. It reinforces using the drive’s meters actively:
not just reading static values, but watching them during starting,
ramping, and loading to see the fault develop, which often reveals the
cause directly. This active use of the drive’s live monitoring —
observing the values’ behavior through the fault-triggering conditions —
turns the drive’s self-monitoring into a powerful diagnostic technique,
showing the technician exactly what is happening at the moment of the
fault, which frequently points straight to the cause in a way that no
external measurement or inference could match.
Combining diagnostics with the fault code
The drive’s diagnostics are most powerful combined with the fault
code, and understanding how they work together completes the picture of
using the drive’s self-reporting. The fault code names the category of
the fault, pointing the diagnosis; the live meters then let the
technician investigate that category by watching the relevant values. An
overcurrent code directs attention to the current, which the technician
watches during operation to see when and why it spikes. An overvoltage
code directs attention to the DC bus voltage, watched to see it climb on
deceleration. So the code points to what to watch, and the meters show
it happening — together taking the diagnosis from the reported category
to the observed cause. This combination — the code pointing, the meters
revealing — is the essence of using the drive’s self-reporting
effectively. Understanding how they work together completes the
technique: read the fault code for the category, then use the relevant
live meter, watched during the fault-triggering operation, to see the
cause. It reinforces that the drive’s fault code and live diagnostics
are complementary: the code focuses the investigation, and the meters
carry it out, so that using them together — code to point, meters to
reveal — makes the fullest use of the drive’s self-reporting. This is
the power of drive diagnostics: the drive both tells you the category of
fault (the code) and lets you watch the cause develop (the meters),
which together make the drive its own most effective diagnostic
instrument when the technician understands how to use the code and
meters in combination.
The drive as a built-in instrument
A powerful way to think of the drive’s diagnostics is as a built-in
instrument — the drive is, in effect, its own multimeter, ammeter, and
voltmeter, continuously measuring itself. Where troubleshooting other
equipment requires bringing instruments to measure currents, voltages,
and temperatures, the drive already measures these internally and
displays them, so the drive provides the instrumentation built in. This
built-in instrument has advantages: it measures continuously (so you can
watch values over time and during operation), it measures internal
quantities (like the DC bus voltage) that would be hard to measure
externally, and it is always there (no need to connect instruments). So
the drive is a rich built-in diagnostic instrument, often providing more
and better-placed measurements than you could easily take externally.
Understanding the drive as a built-in instrument — continuously
measuring its own currents, voltages, and temperatures, including
internal quantities — encourages making full use of it. It reinforces
using the drive’s own measurements as a primary diagnostic tool, because
the drive provides built-in instrumentation that is continuous,
internal, and always available, often surpassing what external
instruments could easily provide. Understanding that the drive is its
own diagnostic instrument — and using its measurements accordingly — is
one of the most powerful approaches to drive troubleshooting, turning
the drive’s self-monitoring into a built-in instrument that reveals its
internal operation and condition directly, which is a great advantage
the technician should fully exploit.
Scenario: watching the current find the fault
A scenario shows the drive’s live meters revealing a cause. A drive
tripped on overcurrent, but only sometimes during operation, and the
cause was unclear. Rather than guessing, the technician watched the
drive’s live output current meter while the drive ran through its
operation. The current read normal most of the time, but at a certain
point in the machine’s cycle, the current spiked sharply — corresponding
to a moment when the driven mechanism encountered a periodic mechanical
tight spot that momentarily loaded the motor heavily. Watching the live
current revealed exactly when and how the overcurrent occurred, pointing
to the mechanical tight spot as the cause. Investigating the mechanism
at that point in its cycle found the mechanical problem, which was
corrected, eliminating the current spike and the trips. This scenario
shows the drive’s live current meter revealing the cause of an
intermittent overcurrent: watching it during operation showed the
current spiking at a specific point, pointing to the mechanical cause.
Understanding that watching the drive’s live meters during operation
reveals what is happening explains this: the live current showed the
spike and its timing, localizing the cause. It reinforces using the
drive’s meters actively — watching them during operation — to see faults
develop, because this reveals causes (here a periodic mechanical load
spike) that static observation would miss. The scenario reinforces the
power of watching the drive’s live diagnostics during operation: the
current meter showed the overcurrent happening and when, revealing the
mechanical cause directly, which is the most powerful use of the drive’s
self-monitoring.
Combining the drive’s meters with external
measurement
While the drive’s meters are powerful, combining them with external
measurement gives the fullest picture, and understanding when to use
each optimizes the diagnosis. The drive’s meters show what the drive
measures internally — its currents, voltages, temperatures — which is
often sufficient and convenient. But external measurement (with a meter
or clamp meter) complements this: it can verify the drive’s readings
(confirming the drive’s meter is accurate), measure things the drive
does not (like the incoming supply voltage and balance at the
terminals), and check downstream (the motor, the connections). So the
drive’s meters and external measurement are complementary: the drive’s
for its internal quantities and convenience, external for verification,
supply measurement, and downstream checking. Understanding when to use
each — the drive’s meters for internal quantities, external measurement
for verification, supply, and downstream — optimizes the diagnosis. It
reinforces using both: the drive’s built-in diagnostics as the
convenient primary tool, complemented by external measurement for what
the drive does not show or to verify what it does. Understanding the
complementary roles — the drive’s meters and external measurement
together giving the fullest picture — reinforces using both
appropriately, relying on the drive’s convenient internal measurements
while adding external measurement for the supply, for downstream
checking, and for verification, which together provide a complete
diagnostic picture that neither alone would give, making the best use of
both the drive’s self-monitoring and external instruments in the
diagnosis.
The drive as its own best instrument
A consolidating recognition is that the drive is its own best
diagnostic instrument, and appreciating this frames the use of its
diagnostics. The drive continuously measures its currents, voltages,
temperatures, and other quantities — including internal ones like the DC
bus voltage that are hard to measure externally — and displays them,
providing built-in, continuous, well-placed instrumentation. No external
instrument setup can easily match this: the drive’s internal
measurements, continuously available and covering internal quantities,
make it the best-placed instrument for observing its own operation. So
the drive is its own best diagnostic instrument, and using its
diagnostics is often more informative than external measurement.
Recognizing this frames the approach: rely on the drive’s own
measurements as the primary diagnostic tool. It reinforces making full
use of the drive’s diagnostics, because the drive is its own best
instrument — continuously measuring its internal operation in ways
external instruments cannot easily match. Understanding the drive as its
own best diagnostic instrument — its built-in, continuous, internal
measurements — consolidates the approach to drive diagnostics: use the
drive’s own measurements as the primary tool, watching them during
operation to see faults develop, because the drive, measuring itself
continuously and internally, is the best-placed instrument for observing
its own operation, an advantage that makes the drive’s diagnostics
central to troubleshooting it and one of the most powerful tools
available, which the competent technician exploits fully by making the
drive its own primary diagnostic instrument.