To diagnose why a device will not connect, it helps enormously to
understand how a device is supposed to connect — the startup sequence by
which it goes from powered-on to exchanging data — because knowing the
steps tells you where a connection fault is stuck. This chapter walks
through the connection establishment sequence in practical terms, so
that a ‘won’t connect’ fault becomes a matter of identifying which step
is failing.
assignment, connection (application relation), parameterization, then
cyclic data exchange. A device that never reaches data exchange is stuck
at one of these steps — identifying which one localizes the
fault.
The startup steps
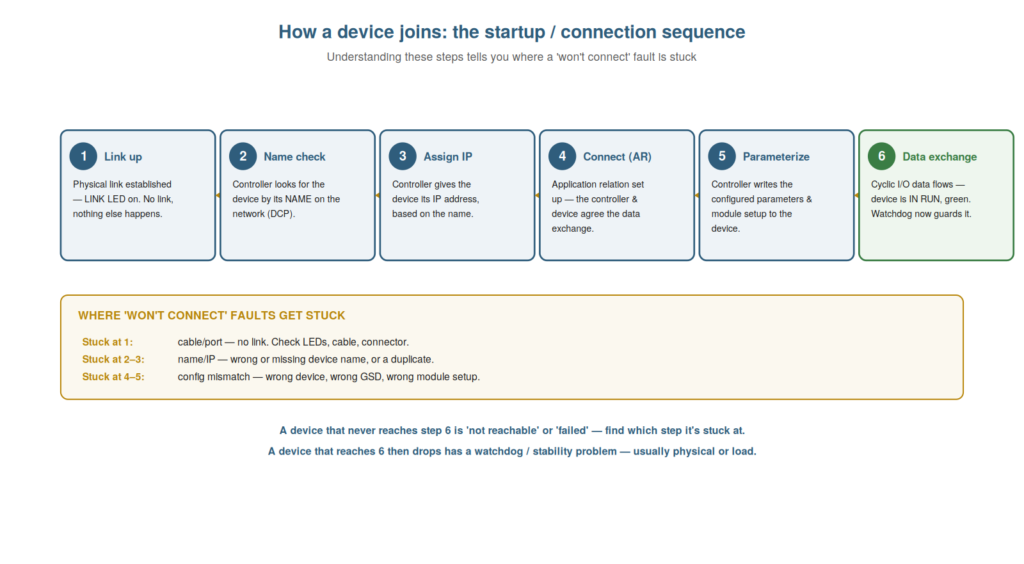
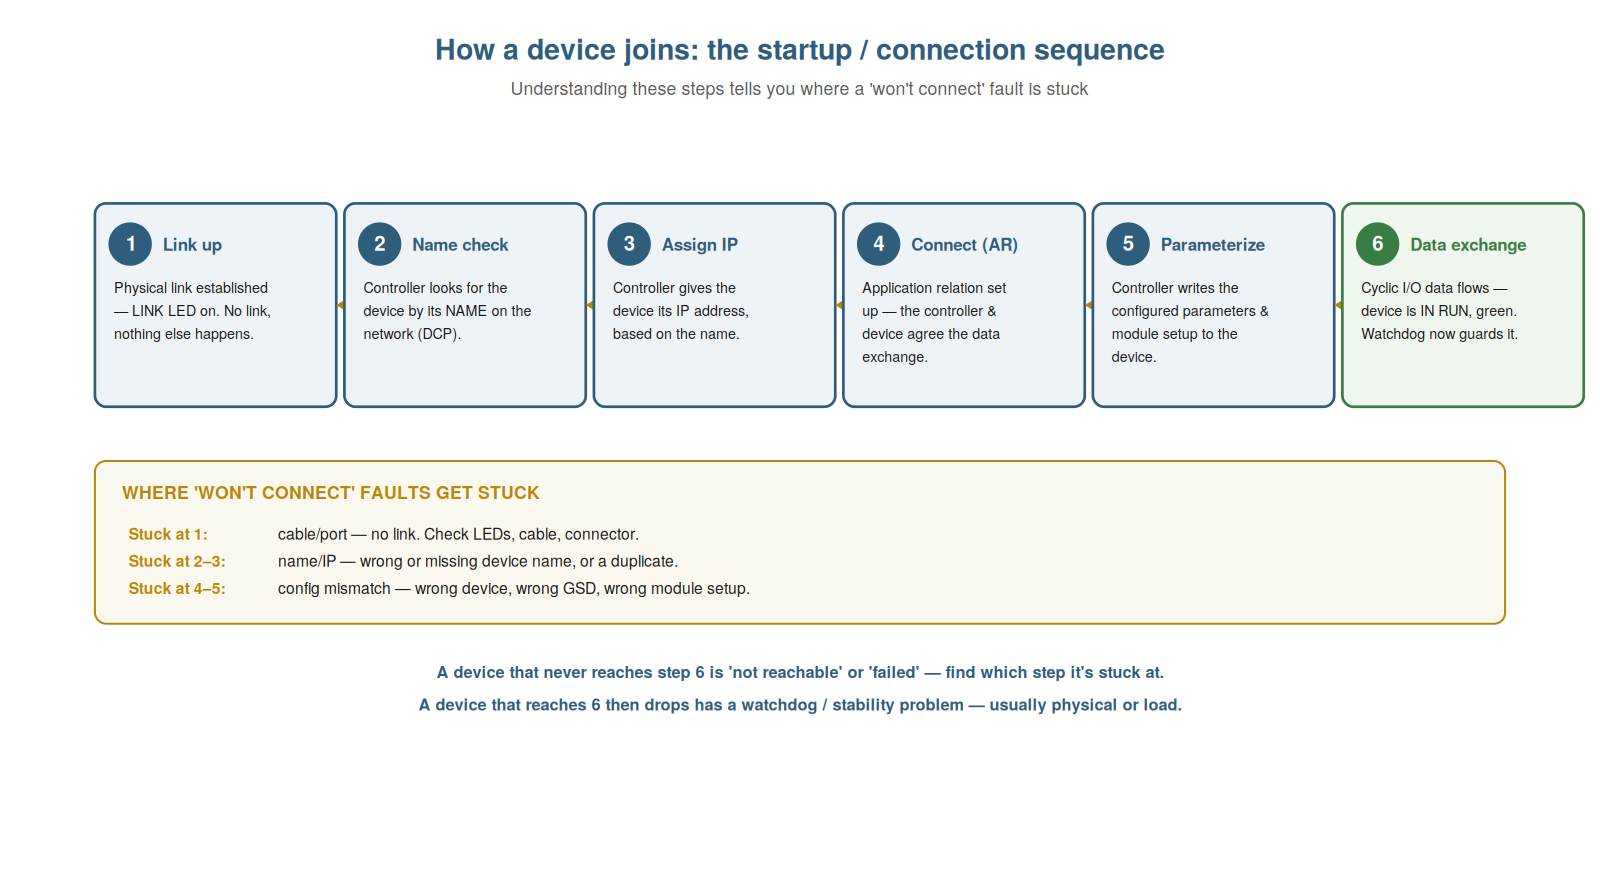
Understanding the sequence of startup steps — from physical link to
data exchange — gives you a framework for diagnosing connection faults
by locating where the sequence stalls. When a device starts up and joins
the network, it goes through a sequence: first, the physical link is
established (the LINK LED comes on — without this, nothing else can
happen); then the controller finds the device by its name on the
network; then the controller assigns the device its IP address; then the
controller sets up the connection (the ‘application relation’, by which
controller and device agree on the data exchange); then the controller
parameterizes the device (writing its configuration and module setup);
and finally, cyclic data exchange begins and the device is running, now
guarded by its watchdog. So the device climbs through these steps to
reach normal operation. Understanding this sequence gives you the
framework: a device that fails to connect is stuck at one of these
steps, and identifying which one localizes the fault. Understanding the
startup steps — link, name, IP, connection, parameterization, data
exchange — provides the framework for locating a connection fault. It
reinforces that a device connects through a sequence of steps, so a
connection fault is a matter of which step the device is stuck at, which
localizes the problem. Understanding the startup steps — the sequence
from physical link through name, IP, connection, and parameterization to
cyclic data exchange — gives you the essential framework for diagnosing
connection faults, because a device that will not connect is stuck at
one of these identifiable steps, so that determining which step it fails
to pass localizes the fault to a specific cause, turning the vague
‘won’t connect’ into the specific ‘stuck at the name step’ or ‘stuck at
parameterization’, which directs your diagnosis precisely.
Mapping faults to steps
The practical power of the startup sequence is in mapping connection
faults to the steps where they occur, and understanding these mappings
lets you translate a stuck device into a specific cause. If the device
is stuck at the link step (no LINK LED), the fault is physical: cable,
connector, port, or the device’s power. If it is stuck at the name step
(has link, but the controller cannot find it by name), the fault is the
name: wrong, missing, or duplicated. If stuck at the IP step, the fault
is addressing: an IP conflict or subnet problem. If stuck at the
connection or parameterization steps (found and addressed, but the data
exchange will not set up), the fault is configuration: the wrong device
type, the wrong GSD, or a module-configuration mismatch between the
project and the actual device. So each step maps to a class of fault:
link to physical, name to naming, IP to addressing,
connection/parameterization to configuration. Understanding these
mappings lets you go from ‘stuck at step X’ to ‘the fault is Y’.
Understanding how to map faults to steps — link to physical, name to
naming, IP to addressing, connection/parameterization to configuration —
translates a stuck device into a specific cause. It reinforces that each
startup step maps to a fault class, so identifying the stuck step
identifies the kind of fault. Understanding how to map connection faults
to the startup steps — a device stuck at link means physical, at name
means naming, at IP means addressing, at connection or parameterization
means configuration — lets you translate a device’s failure to connect
into a specific class of cause, so that by determining which step the
device cannot pass, you know immediately whether to look at the physical
layer, the device name, the addressing, or the configuration, which is
the efficient, targeted way to diagnose a ‘won’t connect’ fault rather
than checking everything blindly.
Using the LEDs and tool together
In practice, you determine where a device is stuck by combining the
LED indications with the engineering tool’s information, and
understanding how to use them together makes locating the stuck step
efficient. The LEDs give the first clue: a dark LINK LED immediately
says the device is stuck at the physical link step (physical fault),
needing no tool. If the LINK LED is on, the device has passed the link
step, so the fault is beyond it (name, IP, or configuration), and you
turn to the tool. The engineering tool’s diagnostics then tell you more:
it may report the device as not found (a name problem), or report a
configuration mismatch (a configuration problem), pinpointing the step.
So the LEDs quickly establish whether the physical link is up (dividing
physical from beyond-physical faults), and the tool’s diagnostics
identify the specific step and fault beyond that. Understanding how to
use the LEDs and tool together — LEDs for the physical link, the tool
for the steps beyond — makes locating the stuck step efficient. It
reinforces that the LEDs quickly establish whether the link is up
(physical vs beyond), and the tool’s diagnostics identify the specific
step and fault, used together to locate the problem. Understanding how
to use the LEDs and the tool together — the LEDs to establish whether
the physical link is up (dividing physical faults from those beyond),
and the tool’s diagnostics to identify the specific step and fault
beyond the link — makes locating a device’s stuck step efficient, so
that you combine the immediate, no-laptop clue of the LEDs with the
detailed information of the engineering tool to pinpoint where in the
startup sequence the device is failing, which localizes the fault
quickly and directs your diagnosis to its specific cause.
Watching a device come up in the tool
A practical technique for connection faults is watching a device come
up in the engineering tool, because seeing the startup progress (or
where it stalls) directly shows the stuck step. When you power up a
device or reconnect it, the tool’s diagnostics can show its progress
through the startup: reaching link, being found, being assigned its
address, connecting, parameterizing, and reaching data exchange.
Watching this, you see how far the device gets and where it stalls: if
it never appears, it is stuck at link or name; if it appears but does
not reach data exchange, it is stuck at connection or parameterization.
So watching the device come up turns the abstract startup sequence into
an observed progression that shows the stuck step directly. This is more
informative than a single after-the-fact status: you see the device
trying and failing at a particular point. Understanding how to watch a
device come up in the tool — observing its startup progress to see where
it stalls — directly reveals the stuck step. Understanding the technique
of watching a device come up in the tool — observing its progress
through the startup sequence to see exactly where it stalls — directly
reveals the stuck step, so that instead of inferring from a static
status, you watch the device attempt to connect and see the point at
which it fails (never appearing means link or name; appearing but not
exchanging data means connection or parameterization), which turns the
startup sequence into an observed diagnosis that localizes the
connection fault to its specific step.
Scenario: stuck at parameterization
A scenario shows the startup sequence localizing a connection fault.
A device would not come online, and the technician used his
understanding of the startup sequence to locate the problem. The LINK
LED was on (so it passed the link step), and watching in the tool, he
saw the device was found and addressed (passing the name and IP steps)
but never reached data exchange — it was stuck at the parameterization
step. Understanding that a device stuck at parameterization points to a
configuration problem, he compared the project configuration to the
actual device and found a module configuration mismatch: the project
expected a module setup that did not match the actual device. Correcting
the configuration to match let the device parameterize and reach data
exchange. The startup sequence had localized the fault to the
configuration. This scenario shows the startup sequence localizing a
connection fault to the configuration step. Understanding the startup
sequence let the technician see the device was stuck at
parameterization, pointing to a configuration mismatch he then found and
fixed. It reinforces that identifying the stuck step (here
parameterization) localizes the fault to its class (configuration),
directing the diagnosis. The scenario reinforces the value of
understanding the startup sequence: by seeing the device reach the
parameterization step but no further, the technician localized the fault
to a configuration mismatch, illustrating how knowing the connection
sequence turns ‘won’t connect’ into the specific ‘stuck at
parameterization’, which points directly to a configuration problem to
find and fix rather than a blind search.
Firmware and compatibility at connection
A subtle connection issue worth understanding is firmware and
compatibility, because a firmware mismatch can prevent or disturb a
connection in ways that are not obvious. A device’s firmware version can
matter for connection: the project may expect a certain firmware, and a
device with incompatible firmware (too old, or unexpectedly different)
may fail to connect properly or exhibit odd behavior, even though the
hardware type is right. This can arise with a replacement device shipped
with different firmware than the original, or after a firmware change.
So when a device of the correct type still will not connect properly,
and the name and configuration seem right, firmware compatibility is
worth considering. The fix may involve updating the firmware to a
compatible version. Understanding firmware and compatibility at
connection — that a firmware mismatch can disturb a connection despite
correct hardware — handles this subtle issue. Understanding firmware and
compatibility at connection — that a device’s firmware version can
matter, and an incompatible firmware may prevent or disturb a connection
despite correct hardware — handles a subtle connection issue, so that
when a device of the right type with the right name and configuration
still will not connect properly, you consider firmware compatibility
(perhaps a replacement shipped with different firmware) as a possible
cause, which may need updating to a compatible version, adding firmware
to your list of things to check for the connection faults that persist
after the more common causes are ruled out.
The sequence as a mental checklist
To close, it helps to see the startup sequence as a mental checklist
you carry into every connection fault, because holding the sequence in
mind structures your diagnosis automatically. The steps — link, name,
IP, connect, parameterize, data exchange — form a checklist: faced with
a device that will not connect, you mentally walk the sequence, asking
at each step whether the device passed it, until you find where it is
stuck. This mental checklist structures the diagnosis without any
external reference: you know the steps, so you know what to check and in
what order. Holding the sequence in mind thus turns every connection
fault into a structured walk through the steps to find the stuck one. So
the sequence is not just knowledge but a working mental checklist that
guides the diagnosis of any connection fault. Understanding the sequence
as a mental checklist — walked through to find the stuck step —
structures the diagnosis of any connection fault. Understanding the
startup sequence as a mental checklist — the steps of link, name, IP,
connect, parameterize, and data exchange held in mind and walked through
to find where a device is stuck — structures your diagnosis of any
connection fault automatically, so that faced with a device that will
not connect, you mentally check each step in order until you find the
stuck one, which turns the sequence from static knowledge into a working
diagnostic checklist that guides you efficiently through any connection
fault to its stuck step and thence its cause.