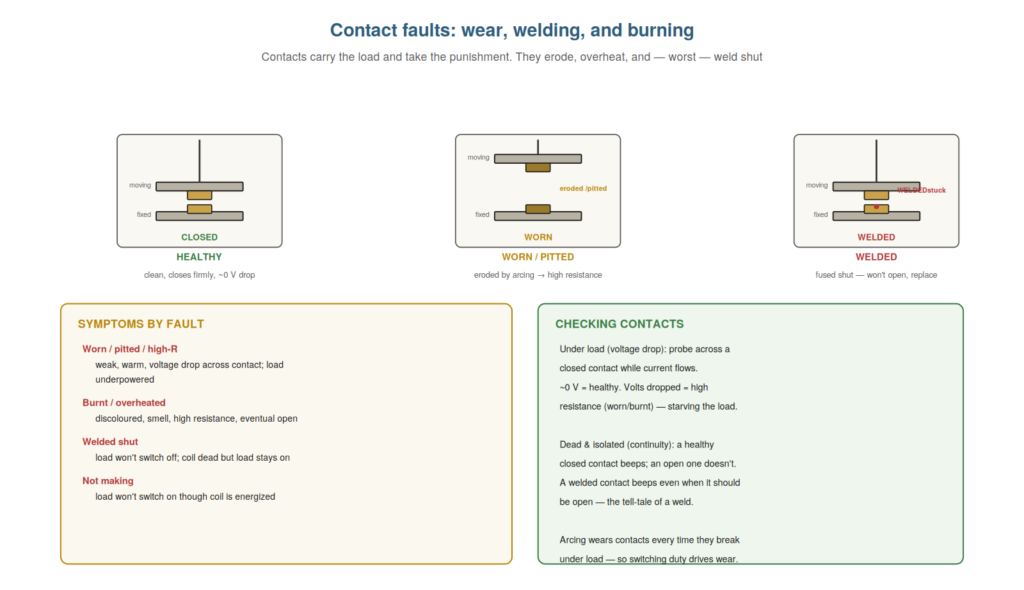
The contacts are the output side of a contactor or relay, and understanding contact faults — wear, welding, burning, and failure to make — is essential, because the contacts do the actual switching and take the punishment of it, so they are a very common fault location. Contacts erode from arcing, overheat and burn, weld shut, or simply fail to make. Understanding these faults, their symptoms, and how to test contacts lets you diagnose the output side confidently. This chapter covers contact faults.
How contacts wear and fail
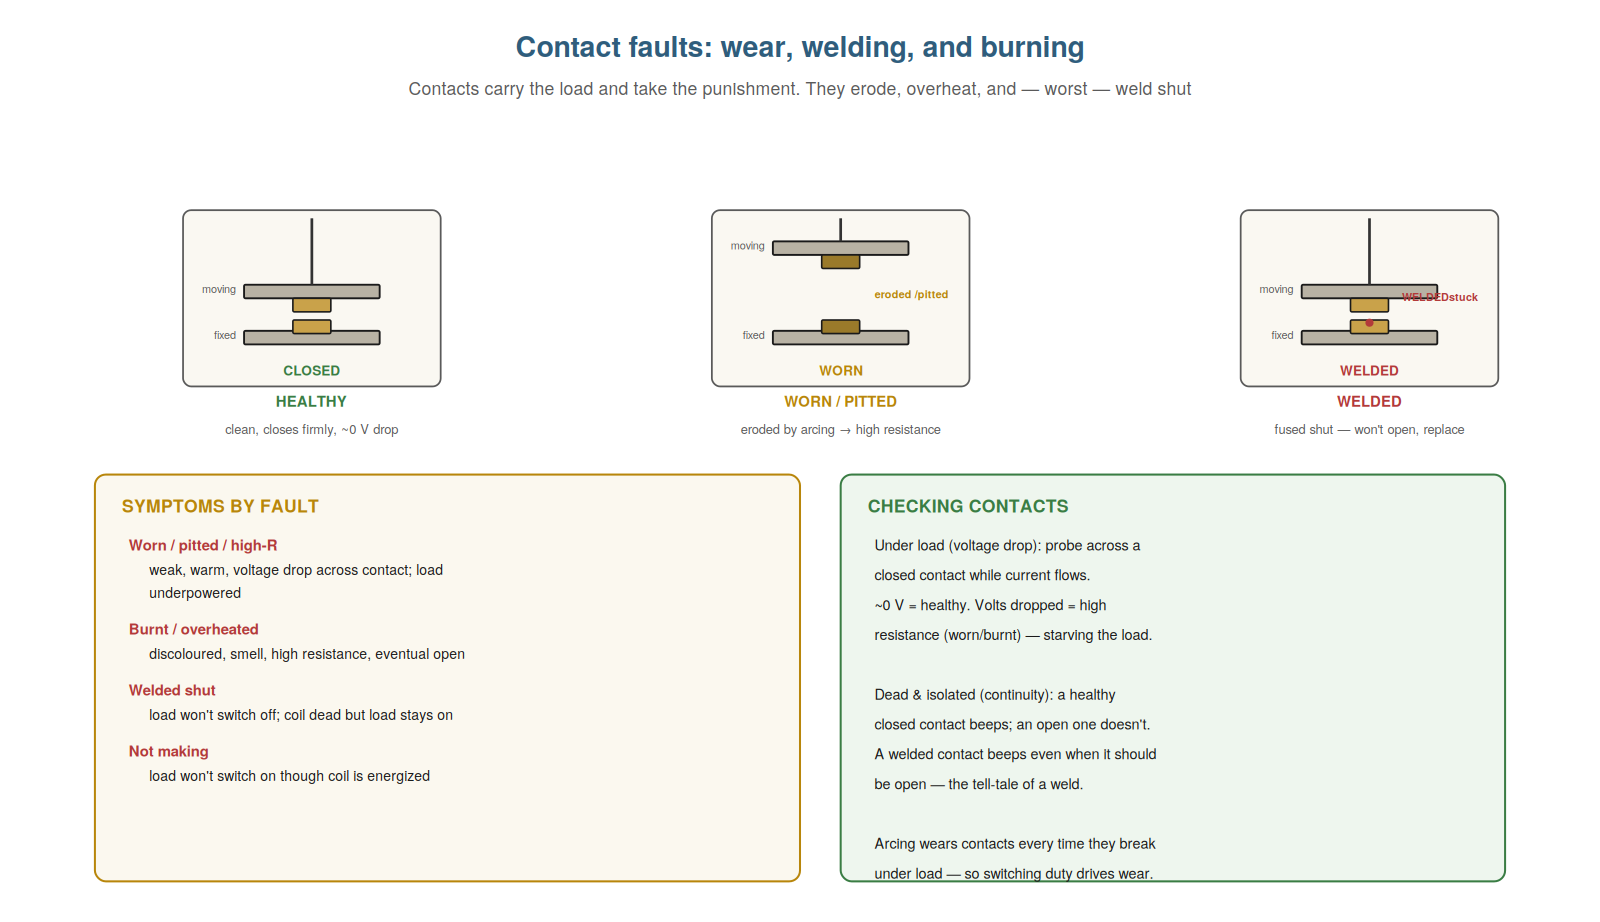
Understanding how contacts wear and fail — the arcing that erodes them and the heat that burns and welds them — explains why contacts are such a common fault location and what the faults are. Every time contacts break a circuit under load, an arc is drawn as they separate, and this arcing erodes the contact surfaces slightly each time — so over many operations, especially switching heavy or inductive loads, the contacts wear and pit. This wear leads to higher contact resistance (the eroded surfaces make poorer contact), which causes voltage drop and heating. Excess heat, from high resistance or heavy current, burns the contacts (discolouring and further degrading them) and, in the extreme, welds them shut (fusing the surfaces together). Contacts can also simply fail to make — worn or misaligned so they no longer close properly. So contacts fail by wear (from arcing), high resistance, burning, welding, and failure to make — a progression driven by the punishment of switching. Understanding this explains why contacts, doing the switching, are a common fault location, and what forms the faults take. So understanding how contacts wear and fail — arcing eroding them toward high resistance, burning, and welding — explains the common contact faults. Understanding how contacts wear and fail — the arcing that erodes them each time they break a load, leading through wear and pitting to high resistance, then to burning from the heat, and in the extreme to welding shut, plus simple failure to make — explains why contacts are such a common fault location and what the faults are, so that you understand the progression from arcing wear to high resistance, burning, and welding driven by the punishment of switching, which grounds your diagnosis of the output side in how contacts actually degrade and fail under the duty of switching real loads.
Symptoms by fault
Understanding the symptoms of each contact fault lets you recognize which contact fault you have from how the circuit behaves. A worn or high-resistance contact drops voltage under load, so the load beyond it is underpowered — a motor runs weak, a coil chatters — and the contact runs warm; measuring across it under load shows the voltage drop. A burnt or overheated contact shows similar high-resistance symptoms, often with discolouration or a smell, progressing toward an open. A welded contact will not open, so the load will not switch off — the tell-tale being the coil de-energized but the load still on. A contact that fails to make means the load will not switch on though the coil is energized — the contact is not closing (worn, misaligned) despite the device operating. So each contact fault has a characteristic symptom: high-resistance faults underpower and warm the load, welded contacts keep it on, and failure-to-make keeps it off. Understanding these symptoms lets you recognize the fault from the behavior: load weak and warm points to high resistance, load stuck on to welding, load stuck off to failure to make. So understanding symptoms by fault lets you recognize which contact fault you have from the circuit’s behavior. Understanding the symptoms by fault — a worn/high-resistance contact underpowering and warming the load, a welded contact keeping the load on with the coil dead, and a failure-to-make keeping the load off though the coil is energized — lets you recognize which contact fault you have from how the circuit behaves, so that you read the symptom (a weak warm load meaning high resistance, a load stuck on meaning a weld, a load stuck off despite an energized coil meaning failure to make) and identify the specific contact fault, which directs your diagnosis to the right contact problem from the characteristic behavior it produces.
Testing contacts: drop and continuity
The two ways to test contacts — voltage drop under load and continuity when dead — let you confirm a contact fault, and understanding them lets you check contacts confidently. The voltage-drop test (live, under load): with current flowing, measure across a closed contact. A healthy closed contact drops almost nothing (near 0 V); a worn or high-resistance contact drops a significant voltage (volts) as the load current flows through its resistance — revealing the high resistance that a continuity test would miss and that starves the load. The continuity test (dead, isolated): a healthy closed contact has continuity (beeps); an open one does not. Crucially, a welded contact has continuity even when it should be open — testing a contact that should be open and finding continuity is the tell-tale of a weld. So voltage drop finds high-resistance (worn/burnt) contacts under load, and continuity confirms open, closed, and welded contacts on a dead circuit. Understanding both tests lets you confirm any contact fault: drop for high resistance, continuity for making, and the welded tell-tale. So understanding testing contacts by drop and continuity lets you confirm the specific contact fault. Understanding how to test contacts by drop and continuity — the voltage-drop test under load revealing high resistance (near 0 V healthy, volts dropped for a worn/burnt contact), and the continuity test when dead confirming a contact makes (with a welded contact tell-tale of continuity when it should be open) — lets you confirm a contact fault confidently, so that you use voltage drop to catch the high-resistance worn or burnt contacts that starve a load and continuity to confirm making, opening, and the welded contact that beeps when it should be open, which gives you definitive tests for the output side to match the symptom to a confirmed contact fault.
Inspecting and (not) filing contacts
A practical point worth understanding is how to inspect contacts and why filing them is usually the wrong fix, because it corrects a common bad habit. Inspecting contacts (with the device isolated and safe to open) can reveal their condition: clean and slightly greyed contacts are normal; heavily pitted, blackened, or eroded contacts are worn; a bluish or melted appearance suggests overheating or welding. It is tempting to file or sand worn contacts to ‘clean them up’, but this is usually wrong: modern contacts have a thin layer of special material (often silver-based) designed for the duty, and filing removes this layer, exposing the base metal and shortening the contact’s life or worsening its performance. The slightly rough, greyed appearance of used contacts is normal and should not be filed smooth. So the right response to worn contacts is usually to replace the contact set or the device, not to file them. Understanding this corrects the filing habit and directs proper repair. So understanding inspecting and not filing contacts directs proper contact repair. Understanding how to inspect contacts and why filing them is usually wrong — recognizing normal greyed contacts, worn pitted ones, and overheated melted ones, and knowing that filing removes the special surface material and shortens contact life — corrects a common bad habit and directs proper repair, so that you inspect contacts to judge their condition but replace worn contact sets or the device rather than filing them, understanding that the slightly rough greyed surface of used contacts is normal and that filing exposes the base metal and worsens performance, which directs the proper response to worn contacts and corrects the counterproductive habit of filing them.
Scenario: the warm contactor and the weak motor
A scenario shows voltage-drop testing finding worn contacts behind a weak motor. A motor ran but seemed weak and underpowered, and the contactor felt warm to the touch. The technician, understanding contact wear, suspected high-resistance main contacts. He measured the voltage drop across each main contact under load (with the motor running): one contact dropped several volts across it, while healthy contacts drop nearly none. That worn, high-resistance contact was dropping voltage and dissipating heat (hence the warm contactor), starving the motor of full voltage on that phase. Continuity alone would not have revealed it — the contact still conducted — but the voltage drop under load exposed the high resistance. He replaced the worn contacts (or the contactor), and the motor ran at full strength with the contactor cool. Understanding contact wear and voltage-drop testing found the fault a continuity test would miss. This scenario shows voltage-drop testing finding worn high-resistance contacts. Understanding to measure voltage drop under load led the technician to find the worn contact starving the motor. It reinforces that voltage drop under load reveals worn high-resistance contacts that continuity misses. The scenario reinforces contact testing: understanding that worn contacts develop high resistance led the technician to measure voltage drop across the main contacts under load and find one dropping several volts, illustrating how voltage-drop testing reveals the worn high-resistance contacts (starving the motor and warming the contactor) that a continuity test would pass, catching the silent contact fault behind a weak motor.
Contact wear as a wear-out, not a defect
An important perspective worth understanding is that contact wear is a normal wear-out process, not necessarily a defect, because it shapes how you think about contact life and replacement. Contacts wear a little every time they break a load under arcing — this is inherent to their function, not a defect. So contacts have a finite life measured in operations (switching cycles): a contactor rated for so many operations will, after that many, have worn contacts, which is expected wear-out, not a fault. Understanding this shapes your approach: worn contacts on a heavily-cycled contactor near its rated life are a wear-out to be addressed by replacement (planned, ideally), not a puzzling defect; and a contactor wearing out much faster than its rated life suggests an aggravating cause (under-rating, an over-harsh load, excessive cycling). So understanding contact wear as a wear-out process, with a finite operational life, frames worn contacts correctly — as expected end-of-life or, if premature, as pointing to an aggravating cause. So understanding contact wear as a wear-out, not a defect, frames contact life and replacement correctly. Understanding contact wear as a normal wear-out process — inherent to breaking loads under arcing, giving contacts a finite life in operations rather than being a defect — shapes how you think about contact life and replacement, so that you treat worn contacts on a heavily-cycled contactor near its rated life as expected wear-out to be replaced (ideally on a planned basis), while recognizing much-faster-than-rated wear as pointing to an aggravating cause (under-rating, a harsh load, excessive cycling), which frames worn contacts correctly as either normal end-of-life or a symptom of an underlying stress rather than a puzzling defect.
Two tests that cover every contact fault
To close, it is worth consolidating that two tests — voltage drop under load and continuity when dead — cover every contact fault, because between them they diagnose the output side completely. Voltage drop under load finds high-resistance contacts (worn, burnt) that a continuity test would pass but that starve the load. Continuity when dead finds whether a contact makes (closed and conducting) or not (open), and catches a welded contact (continuity when it should be open). Between them, these two tests diagnose every contact condition: healthy (low drop, correct continuity), worn/burnt (high drop), not making (no continuity when it should), and welded (continuity when it shouldn’t). So mastering these two tests equips you to diagnose any contact fault. Understanding that two tests cover the field makes contact diagnosis systematic and complete. So understanding that voltage drop and continuity cover every contact fault makes contact diagnosis complete. Understanding that two tests — voltage drop under load and continuity when dead — cover every contact fault makes contact diagnosis complete, so that between them you diagnose every contact condition (healthy, worn/burnt by a high drop, not making by no continuity, welded by continuity when it should be open), which means mastering these two tests equips you to diagnose any contact fault systematically and completely, the consolidation that makes the output side of a contactor or relay fully diagnosable with a small, reliable set of measurements.