When a contactor or relay must be replaced, understanding how to select the correct replacement — and consolidating the common faults into a reference — completes the practical picture, because a wrong replacement causes its own faults and a fault reference speeds diagnosis. Replacing like-for-like on the ratings that matter avoids introducing new problems, and a fault-to-cause map directs you quickly to the likely cause of each symptom. This chapter covers replacement, selection, and common faults.
Selecting a correct replacement
When replacing a contactor or relay, understanding how to select a correct replacement — matching the ratings that matter — avoids introducing new faults. The replacement must match the original on the key ratings: the coil voltage and type (so it is fed the right voltage — the commonest replacement error is a wrong coil voltage), the contact ratings (current, voltage, and utilisation category, so the contacts suit the load), the number and type of contacts (enough main and aux contacts, NO and NC as needed), and the physical form (so it fits and wires correctly). Matching these ensures the replacement does the same job without new problems. The most important checks are the coil voltage (get this wrong and it burns out or won’t work) and the contact rating (get this wrong and it wears or welds prematurely). So selecting a correct replacement means matching coil voltage, contact rating, contact configuration, and form — reading the old device’s label and matching it. Understanding this avoids the self-inflicted faults of a mismatched replacement. So understanding selecting a correct replacement — matching the ratings that matter — avoids introducing new faults. Understanding how to select a correct replacement — matching the coil voltage and type, the contact ratings and utilisation category, the contact configuration, and the physical form to the original — avoids introducing new faults, so that you replace like-for-like on the ratings that matter (especially the coil voltage, whose mismatch burns out the coil, and the contact rating, whose mismatch wears or welds the contacts), reading the old device’s label to match it, which prevents the self-inflicted faults that a mismatched replacement causes and ensures the new device does the same job reliably.
The common-fault reference
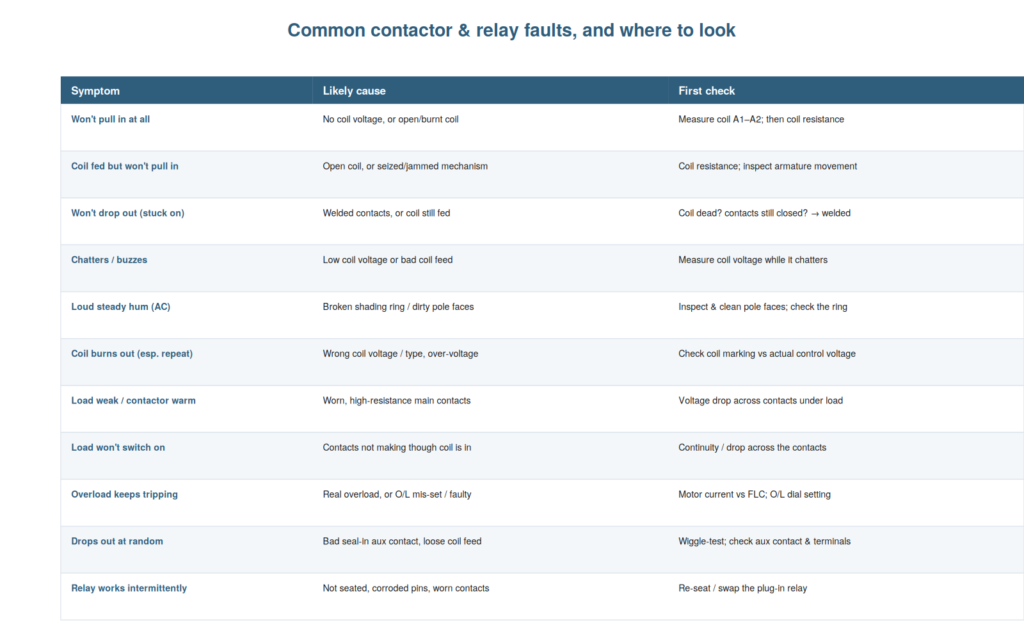
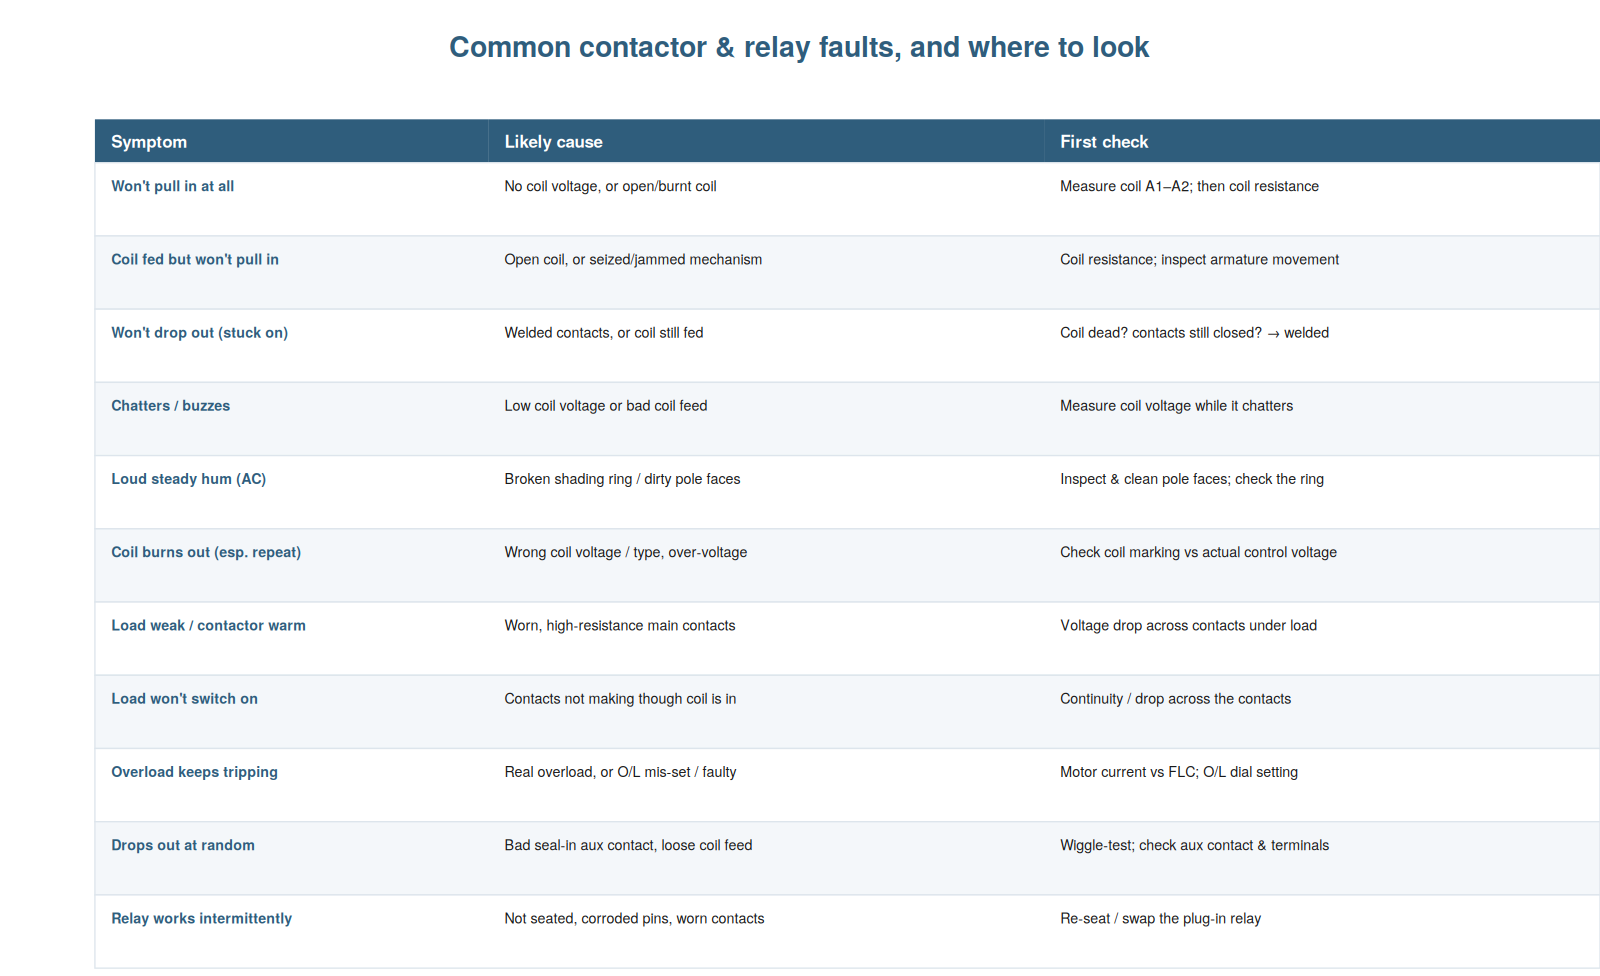
Consolidating the book’s diagnostics, understanding the common-fault reference lets you go straight to the likely cause of each symptom. The reference maps each common symptom to its likely cause and first check: won’t pull in at all → no coil voltage or open coil (measure coil, then resistance); coil fed but won’t pull in → open coil or seized mechanism (resistance, inspect movement); won’t drop out → welded contacts or coil still fed (coil dead but contacts closed means welded); chatters/buzzes → low coil voltage or bad feed (measure coil while chattering); loud hum on AC → broken shading ring or dirty pole faces (inspect and clean); coil burns out → wrong voltage/type or over-voltage (check marking vs supply); load weak/contactor warm → worn high-resistance contacts (voltage drop under load); load won’t switch on → contacts not making (continuity/drop); overload keeps tripping → real overload or mis-set/faulty O/L (current vs FLC and setting); drops out at random → bad seal-in aux or loose feed (wiggle-test); relay intermittent → not seated or corroded pins (re-seat/swap). So each symptom maps to a cause and starting point. Understanding this reference lets you respond to each fault efficiently. So understanding the common-fault reference lets you go straight to the likely cause and first check for each symptom. Understanding the common-fault reference — each common symptom mapped to its likely cause and first check, from won’t-pull-in and won’t-drop-out through chatter, hum, coil burnout, worn contacts, overload trips, and intermittents — lets you go straight to the likely cause of each symptom, so that when you meet a fault you can go directly to its probable cause and starting point rather than searching, which consolidates the book’s diagnostics into a practical reference directing you to the right place for each of the common contactor and relay faults.
When to escalate
Part of good troubleshooting is knowing when to escalate a fault beyond your scope, and understanding this — escalating with good information — is responsible practice. If you have applied the method and cannot find or safely fix the fault, or if it involves things beyond your training or authorization (high-voltage power work, complex control systems, safety-related circuits, motor internal faults), the right action is to escalate to a more experienced technician or the right specialist rather than making changes you are unsure of or working beyond your competence. Escalating with good information helps: you can report the symptom, what you checked, and your measurements, which speeds the expert’s work. Escalating is not failure; it is the responsible choice when a fault exceeds your knowledge or authority, and it avoids the harm that guessing or overreaching could cause — important where mains power, motors, and safety systems are involved. Understanding when and how to escalate is responsible practice. So understanding when to escalate — with good information, when the fault exceeds your scope — is responsible practice. Understanding when to escalate — and doing so with the good diagnostic information you have gathered — is part of responsible troubleshooting, so that when a fault exceeds your training or authority, or resists your systematic diagnosis, or involves high-voltage power, motor internals, or safety systems beyond your scope, you escalate to the appropriate expert with what you have found, which handles the fault responsibly and helps the expert, recognizing that knowing your limits and escalating well is a mark of good practice that protects both the equipment and your safety.
Like-for-like and reading the old label
A practical principle worth understanding is replacing like-for-like by reading the old device’s label, because it is the reliable way to get a correct replacement. The surest way to select a correct replacement is to read the failed device’s markings — its coil voltage and type, its contact ratings and configuration, its part number — and match them. A like-for-like replacement (the same or an equivalent device with matching ratings) does the same job without introducing new problems. The most critical match is the coil voltage (and AC/DC type), since a mismatch here burns out the coil; next, the contact rating and configuration, so the contacts suit the load. Reading the old label is more reliable than guessing or assuming, especially if a previous replacement was itself wrong (in which case the label may be wrong, so cross-check against the control voltage actually present). Understanding this principle — read the label, match like-for-like — gives you a reliable replacement method. So understanding like-for-like replacement by reading the old label gives a reliable way to select a correct replacement. Understanding to replace like-for-like by reading the old device’s label — matching the coil voltage and type, contact ratings and configuration, and part number, with the coil voltage being the most critical match — gives you a reliable way to select a correct replacement, so that you read the failed device’s markings and match them for a like-for-like replacement that does the same job, prioritizing the coil voltage (whose mismatch burns out the coil) and the contact rating, while cross-checking against the actual control voltage in case a previous replacement was itself wrong, which is the dependable method for getting a replacement that will not introduce new faults.
Scenario: the replacement that didn’t fit the job
A scenario shows how matching ratings avoids a replacement that fails. A contactor’s contacts wore out quickly, and the previous replacement had been chosen on size and price without checking the utilisation category. The technician, understanding contact ratings, read the labels: the fitted contactor was rated AC-1 (for resistive loads), but it was switching a motor — an AC-3 duty with harsh inrush. The under-categorized contactor’s contacts wore rapidly under the motor’s demanding switching. He selected a correct replacement rated AC-3 for the motor load, matching the coil voltage and contact configuration too, and it lasted as it should. Understanding ratings and utilisation categories — that a motor needs AC-3 — explained the rapid wear and directed a correct replacement, where a like-for-size swap would have worn out again. This scenario shows matching the utilisation category avoiding a replacement that wears out. Understanding contact ratings and categories led the technician to select an AC-3 contactor for the motor. It reinforces that matching the rating and category to the load is essential to a lasting replacement. The scenario reinforces selection: understanding utilisation categories led the technician to replace an under-categorized AC-1 contactor with a correct AC-3 one for the motor load, illustrating how matching the rating and category to the job — not just size — avoids a replacement that wears out again, addressing the cause of rapid contact wear through correct selection.
Upgrading when the original keeps failing
A nuance worth understanding is that when an original device keeps failing, the right replacement may be an upgrade, not a like-for-like, because a repeat failure can mean the original was under-specified. Like-for-like replacement is usually correct — but if the original device fails repeatedly in the same way (contacts wearing or welding quickly, the device running hot), it may be that the original was under-rated or wrongly categorized for the actual load, so replacing it like-for-like just repeats the failure. In that case, the right move is to upgrade: fit a device with a higher rating or the correct utilisation category for the load (a larger contactor, an AC-3 device for a motor), addressing the under-specification. Understanding this distinguishes a genuine device failure (replace like-for-like) from an under-specification (upgrade): a one-off failure of an adequately-rated device is replaced in kind, but a repeat failure of an under-rated device calls for an upgrade to the correct specification. So understanding when to upgrade rather than replace like-for-like addresses repeat failures from under-specification. Understanding that a repeatedly-failing device may need an upgrade rather than a like-for-like replacement — because a repeat failure in the same way can mean the original was under-rated or wrongly categorized for the load — addresses under-specification, so that when a device fails repeatedly (contacts wearing or welding quickly, running hot) you consider that the original was under-specified and upgrade to the correct rating or utilisation category rather than repeating the failure with an identical under-rated part, which distinguishes a genuine one-off failure (replace in kind) from a chronic under-specification (upgrade) and resolves repeat failures at their root.
A reference and a method together
To close, it helps to appreciate that this chapter gives you both a reference and a method, because having both equips you for the full range of faults. The fault-to-cause map is a reference: a quick lookup for the common faults and where to look. The general approach beneath it is a method: a procedure for any fault, including the uncommon. Together they equip you fully: the reference gives fast answers for the common cases you meet most, and the method gives a reliable procedure for anything the reference does not cover. So you carry both — the map for speed on common faults, the method for coverage of all faults. Understanding that you have both equips you for the frequent and the novel alike. So understanding that you have both a reference and a method equips you for the full range of faults. Understanding that this chapter gives you both a reference and a method — the fault-to-cause map for fast answers on common faults and the general approach for a reliable procedure on any fault — equips you for the full range of contactor and relay faults, so that you carry the specific map for speed on the frequent cases and the general method for coverage of the novel ones, which together provide complete preparation: quick lookup for what you meet most and a dependable procedure for whatever the map does not cover, the reference and the method complementing each other for the frequent and the novel alike.