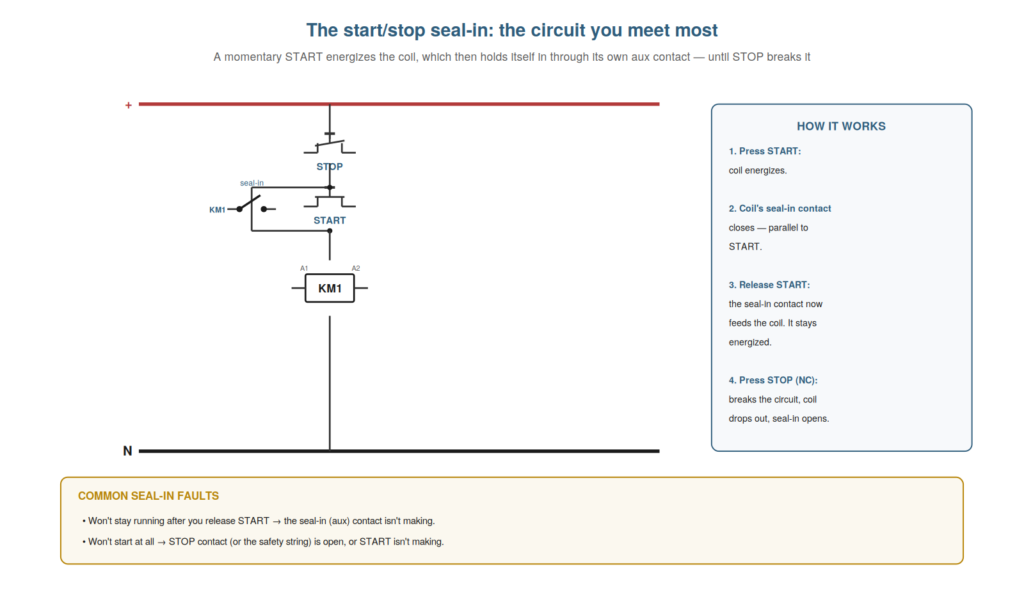
The start/stop seal-in is the single most common control circuit you will meet, and understanding it thoroughly — how it works and how it fails — is essential, because so many machines start and stop this way and so many faults involve it. In a seal-in circuit, a momentary start button energizes a contactor, which then holds itself in through its own aux contact until a stop button breaks the circuit. Understanding this circuit lets you diagnose the very common faults of a machine that will not start, or will not stay running. This chapter covers the start/stop seal-in in depth.

How the seal-in works
Understanding how the seal-in works — the sequence by which a momentary press gives continuous operation — is the foundation for diagnosing its faults. The sequence: pressing the start button (normally-open) completes the coil circuit, energizing the contactor’s coil. The energized coil closes its seal-in aux contact, which is wired in parallel with the start button. Now, when the start button is released, the seal-in contact continues to feed the coil (providing the path the released start button no longer does), so the coil stays energized — it has ‘sealed itself in’. The stop button (normally-closed) is in series in the circuit; pressing it breaks the circuit, dropping the coil out, which opens the seal-in contact, so the coil stays off until start is pressed again. So the seal-in gives continuous operation from a momentary start, held by the coil’s own contact, until stop breaks it. Understanding this sequence is the foundation for diagnosis, because each fault corresponds to a break in this sequence. So understanding how the seal-in works — the coil holding itself in through its own contact until stop — is the foundation for diagnosing seal-in faults. Understanding how the seal-in works — the momentary start energizing the coil, the coil’s seal-in aux contact then feeding it so it stays energized after start is released, and the normally-closed stop breaking the circuit to drop it out — is the foundation for diagnosing its faults, so that you understand the sequence by which a momentary press gives continuous operation held by the coil’s own contact, which lets you recognize each seal-in fault as a specific break in this sequence and is the essential basis for troubleshooting the most common control circuit you will meet.
Won’t stay running: the seal-in contact
The characteristic seal-in fault is a machine that starts but will not stay running, and understanding it points directly to the seal-in contact. The symptom: the machine runs only while you hold the start button, and drops out the instant you release it. Understanding the seal-in explains this exactly: pressing start energizes the coil (so the machine starts), but when you release start, the coil drops out — which means the seal-in contact is not holding it in. The seal-in aux contact is not making (worn, not closing, or its wiring open), so it fails to provide the path that should feed the coil after start is released. So this symptom points directly to the seal-in contact: the coil energizes fine (the machine starts), but the seal-in fails to hold it (it drops out on release). Understanding this lets you go straight to the seal-in aux contact and its wiring, measuring whether it makes when the coil is energized. So understanding the won’t-stay-running fault — the seal-in contact not holding the coil in — points directly to the seal-in aux contact. Understanding the won’t-stay-running fault — the machine running only while start is held and dropping out on release, because the seal-in contact is not holding the coil in — points directly to the seal-in aux contact and its wiring, so that when a machine starts but will not stay running, you recognize the coil energizes fine but the seal-in fails to hold it, and you go straight to checking whether the seal-in aux contact makes when the coil is energized (measuring across it, or its wiring), which is the direct diagnosis of this characteristic and common seal-in fault.
Won’t start: stop, start, and the safety string
The other common seal-in fault is a machine that will not start at all, and understanding it directs you to the stop button, the start button, or the safety string in series with them. The symptom: pressing start does nothing — the coil never energizes. Understanding the circuit explains the possibilities: the coil circuit runs through the normally-closed stop button (and often a string of other normally-closed safety contacts — E-stops, interlocks, overload) in series, then the start button, to the coil. For the coil to energize, all the normally-closed contacts must be closed and the start button must make. So a won’t-start fault means an open somewhere in this series path: the stop button open (faulty, or its wiring), a safety contact open (an E-stop pressed, an interlock open, the overload tripped — which may be intended, not a fault), or the start button not making. Understanding this directs you to trace the series path: is the safety string intact? is start making? So understanding the won’t-start fault — an open in the series path of stop, safety string, and start — directs you to trace that path. Understanding the won’t-start fault — pressing start doing nothing because the coil never energizes, due to an open in the series path of the normally-closed stop, the safety string, and the start button — directs you to trace that path, so that when a machine will not start you check the series circuit feeding the coil for an open: a faulty stop or its wiring, a safety contact open (an E-stop, interlock, or tripped overload, possibly doing its job rather than faulty), or a start button not making, which is the systematic diagnosis of the won’t-start seal-in fault and correctly considers that some opens in the safety string are intended rather than faults.
Where the seal-in contact comes from
A detail worth understanding is exactly which contact provides the seal-in, because it clarifies what to check and how the circuit is wired. The seal-in contact is one of the contactor’s own normally-open auxiliary contacts — a contact that closes when the contactor’s coil is energized. It is wired in parallel with the start button, so that when the coil energizes (by the start button) and this aux contact closes, the aux contact provides an alternative path around the start button, keeping the coil fed after start is released. So the seal-in comes from the contactor sealing itself in through its own NO aux contact. Understanding this clarifies troubleshooting: to check the seal-in, you check this specific NO aux contact (does it close when the coil is energized?) and its wiring parallel to the start button. It also clarifies that the seal-in depends on the contactor having a spare NO aux contact for the purpose. So understanding where the seal-in contact comes from — the contactor’s own NO aux contact — clarifies what to check. Understanding where the seal-in contact comes from — one of the contactor’s own normally-open auxiliary contacts, wired parallel to the start button so it feeds the coil once the coil closes it — clarifies what to check and how the circuit is wired, so that you know the seal-in is the contactor sealing itself in through its own NO aux contact, and to troubleshoot it you check that specific aux contact (does it close when the coil is energized?) and its parallel wiring, which precisely identifies the contact responsible for the seal-in and directs your diagnosis to it.
Scenario: runs only while held
A scenario shows the seal-in understanding solving the classic won’t-stay-running fault. A motor ran only while the operator held the start button, dropping out the moment it was released. The technician, understanding the seal-in, recognized this immediately: the coil energized (the motor started with start held), but it dropped out on release, so the seal-in contact was not holding it in. He went straight to the seal-in aux contact. With start held (the contactor in), he measured across the seal-in contact: it read full voltage, meaning it was not closing — it should have had near-zero volts across it if making. So the seal-in aux contact was not making (worn or not closing). Replacing the aux contact block restored the seal-in, and the motor kept running after start was released. Understanding the seal-in took him straight to the fault. This scenario shows the seal-in understanding solving the won’t-stay-running fault directly. Understanding that a drop-out on release means the seal-in contact is not holding led the technician straight to the aux contact. It reinforces that runs-only-while-held points directly to the seal-in contact not making. The scenario reinforces the seal-in: understanding that a motor running only while start is held means the seal-in contact is not holding the coil in led the technician straight to the seal-in aux contact, which measured across showed full voltage (not making), illustrating how understanding the seal-in circuit takes you directly from the characteristic symptom to the specific faulty contact, replaced to restore the seal-in.
Testing the seal-in without running the machine
A practical technique worth understanding is testing the seal-in contact without necessarily running the machine, because it lets you confirm the fault safely and directly. To test whether the seal-in aux contact is making, you need to check whether it closes and conducts when the contactor is energized. You can do this by energizing the contactor (by pressing and holding start, or by other safe means) and measuring across the seal-in aux contact: if it is making, it should have near-zero voltage across it (it is a closed contact carrying the circuit); if it reads the full supply voltage across it, it is open (not making) — the fault. Alternatively, with the circuit isolated and dead, you can manually operate the contactor (pressing the armature in by hand, where safe) and check the aux contact’s continuity, confirming it makes when the contactor is in. So you can test the seal-in contact directly — measuring across it energized, or checking its continuity when manually operated — to confirm whether it makes. Understanding this gives you a direct test of the seal-in fault. So understanding testing the seal-in without running the machine gives a direct, safe confirmation of the fault. Understanding how to test the seal-in contact directly — measuring across the aux contact with the contactor energized (near-zero volts if making, full voltage if open) or checking its continuity with the contactor manually operated on a dead circuit — gives a direct, safe confirmation of the fault, so that you can determine whether the seal-in aux contact is making without relying on the machine’s full operation, measuring across it energized or checking its continuity when operated, which directly confirms the seal-in fault (the contact not making) that causes a won’t-stay-running symptom.
The seal-in as the circuit to know cold
To close, it is worth recognizing the start/stop seal-in as the one control circuit to know cold, because it is so common that mastering it pays off constantly. So many machines start and stop through a seal-in that recognizing it instantly, understanding its operation, and knowing its two characteristic faults (won’t stay running — the seal-in contact; won’t start — the stop, safety string, or start) equips you for a huge share of everyday control faults. A technician who knows the seal-in cold diagnoses these faults quickly and confidently, while one who does not puzzles over them repeatedly. So the seal-in is the circuit to know cold: its ubiquity makes mastering it one of the highest-value pieces of control-circuit knowledge. Understanding this emphasizes why the seal-in deserves to be thoroughly learned. So recognizing the seal-in as the circuit to know cold emphasizes its high value. Understanding the start/stop seal-in as the one control circuit to know cold — so common that recognizing it instantly, understanding its operation, and knowing its two characteristic faults equips you for a huge share of everyday control faults — emphasizes why it deserves thorough mastery, so that because so many machines start and stop through a seal-in, knowing it cold lets you diagnose its faults quickly and confidently, which makes mastering the seal-in one of the highest-value pieces of control-circuit knowledge and a circuit worth knowing better than any other.