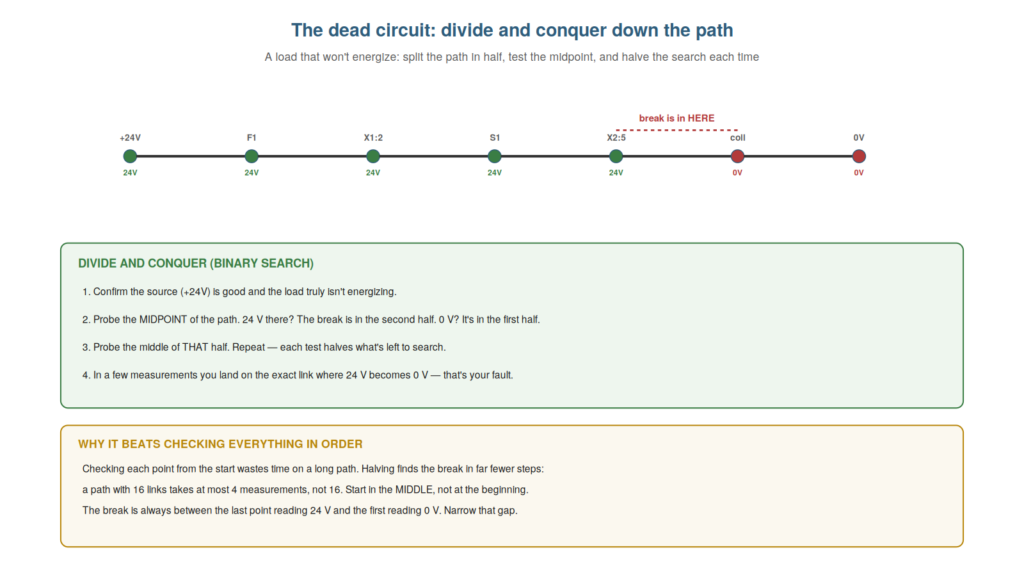
The dead circuit — a load that simply will not energize — is one of the most common faults, and the divide-and-conquer method for finding it is the central technique of control-circuit troubleshooting. Rather than checking every point in order, you split the path in half, test the midpoint, and halve the search with each measurement, cornering the fault efficiently. Understanding this method equips you for the dead circuit and, more broadly, for finding any open. This chapter covers the dead circuit and divide-and-conquer.
Divide and conquer
The core method for a dead circuit is divide and conquer — a binary search down the path — and understanding it is the key to finding a fault efficiently. The method: confirm the source is good and the load truly is not energizing, then probe the midpoint of the path. If the midpoint reads 24 volts, the fault (the break) is in the second half, between the midpoint and the load; if it reads 0 volts, the fault is in the first half, between the source and the midpoint. Either way, you have halved the search. Then probe the midpoint of the remaining half, halving again, and repeat: each measurement halves what is left, quickly narrowing to the exact link where 24 volts becomes 0 volts — the break. So divide and conquer finds the fault by repeated halving, landing on the break in a few measurements. Understanding this method — halving the search each time by probing midpoints — is the key to finding an open efficiently. It reinforces that divide and conquer locates a break by probing the midpoint, determining which half contains the fault, and repeating. Understanding divide and conquer — the binary search that probes the midpoint of the path, determines which half contains the break by whether 24 volts is present, and repeats on that half until it lands on the exact link where 24 volts becomes 0 volts — is the central technique of control-circuit troubleshooting, because it finds an open efficiently by halving the search with each measurement rather than checking every point in order, which turns even a long path into a fault found in a few measurements and is the method at the heart of diagnosing the dead circuit and every open.
Start in the middle, not the beginning
A crucial practical point of divide and conquer is to start in the middle, not the beginning, and understanding why makes your search efficient rather than slow. The temptation, faced with a dead circuit, is to start at the source and check each point in order toward the load — but this is slow, potentially requiring many measurements on a long path (checking every point until you reach the break). Starting in the middle is far more efficient: the first midpoint measurement immediately eliminates half the path, something checking-in-order never does so decisively. By always probing the middle of the remaining suspect section, you halve the search each time, reaching the fault in a number of measurements that grows only slowly with the path length (a path of sixteen links takes at most four measurements, not sixteen). So starting in the middle, not the beginning, is what makes the method efficient. Understanding this — that midpoint probing halves the search while in-order checking does not — is key to using divide and conquer well. It reinforces that you should start in the middle and always probe the midpoint of the remaining section, not check points in order from the start. Understanding to start in the middle, not the beginning — that probing the midpoint halves the search immediately while checking points in order from the source is slow — is what makes divide and conquer efficient, so that you resist the temptation to check every point from the start and instead always probe the middle of the remaining suspect section, halving the search each time and reaching the fault in far fewer measurements (four rather than sixteen on a sixteen-link path), which is the practical discipline that delivers the method’s efficiency and finds the dead circuit’s cause quickly.
Between the last-good and the first-bad point
The principle that makes divide and conquer work is that the break always lies between the last point reading 24 volts and the first reading 0 volts, and understanding this focuses your search on closing that gap. As you measure, you build up a picture: some points read 24 volts (the path is good up to there) and some read 0 volts (the break is above there). The break is always in the gap between the last-good point (highest point reading 24 volts) and the first-bad point (lowest reading 0 volts). Your goal is to narrow this gap until it is a single link — that link is the fault. Each measurement, by reading 24 or 0 volts, moves either the last-good point down or the first-bad point up, closing the gap. So the whole method is about narrowing the gap between last-good and first-bad until the break is pinned to one link. Understanding this principle — the break in the gap, narrowed by each measurement — focuses your search and clarifies what each reading accomplishes. It reinforces that the break lies between the last 24-volt point and the first 0-volt point, and each measurement narrows that gap. Understanding that the break lies between the last-good and the first-bad point — the gap between the highest point reading 24 volts and the lowest reading 0 volts, narrowed by each measurement until it is a single link — focuses your search and clarifies the purpose of every reading, so that you understand divide and conquer as the systematic narrowing of this gap, each measurement moving the last-good point down or the first-bad point up until the break is pinned to one link, which is both the principle that makes the method work and the clear mental picture that guides you through finding any open in the control circuit.
Confirming the source before you divide
An important first step before applying divide and conquer is confirming the source, because dividing the path is pointless if the supply itself is the problem. Before probing midpoints down a rung, verify that the source — the +24V feeding that rung — is actually present and good. If the supply is dead, or the rung is not getting its +24V at all, then the whole rung is dead for that reason, and dividing it will just find 0 volts everywhere, wasting effort. So you first confirm 24 volts is present at the top of the rung (the source is good), establishing that the fault is an open within the rung rather than a missing supply. Only then does dividing the rung make sense: you know 24 volts enters it, so somewhere within it the path breaks. Confirming the source first also catches the broad supply faults quickly (if the whole panel is dead, that is the supply, not one rung). So understanding to confirm the source before dividing ensures you divide a rung that actually has power, not chase a missing supply. Understanding to confirm the source before you divide — verifying 24 volts is present at the top of the rung before probing midpoints within it — ensures you divide a rung that actually has power, so that you do not waste effort dividing a dead rung whose real problem is a missing supply, first establishing that 24 volts enters the rung (the source is good) so that the fault must be an open within it, which both catches broad supply faults quickly and ensures the divide-and-conquer search is applied to a rung that genuinely has power entering it, making source confirmation the sensible first step before dividing.
Scenario: divide and conquer on a long rung
A scenario shows divide and conquer finding a fault efficiently on a long path. A device on a long, multi-component rung was dead, and rather than checking each point from the start, the technician used divide and conquer. He confirmed the source was good (24 volts at the top of the rung), then probed the midpoint of the rung: 24 volts — so the break was in the second half. He probed the midpoint of that half: 0 volts — so the break was in the first quarter of that half. He probed the middle of that: 24 volts — narrowing again. In four measurements he had cornered the break to a single link — a specific terminal that was open — on a rung that would have taken many more measurements checked in order. Divide and conquer had found the fault in a fraction of the measurements. This scenario shows divide and conquer finding a fault efficiently by halving. Understanding divide and conquer let the technician corner the break in four measurements rather than many. It reinforces that probing midpoints and halving finds a break in far fewer measurements than checking in order. The scenario reinforces divide and conquer: the technician found the break on a long rung in just four measurements by confirming the source and then repeatedly probing midpoints to halve the search, illustrating how the binary-search method corners a fault far faster than checking each point in order, delivering the efficiency that makes divide and conquer the central technique for the dead circuit.
When there are parallel paths
A nuance worth understanding is how divide and conquer applies when a rung has parallel paths, because branches complicate the simple linear search and need care. The basic divide-and-conquer method assumes a series path (one line from +24V to 0V). But some rungs have parallel branches — a seal-in contact parallel to a start button, or two contacts in parallel providing alternative paths. Here you must account for the branches: a point may be fed by more than one path, so it reading 24 volts does not mean a single path above it is good — another branch might be feeding it. Understanding this, you treat each branch as a path to consider, and when dividing, you keep track of which paths feed the point you measure. Often you can simplify by considering one branch at a time, or by recognizing which branch should be active in the current state. So understanding parallel paths tells you to account for branches rather than assume a single line, applying the divide method to each relevant path. Understanding when there are parallel paths — that branches mean a point may be fed by more than one route, complicating the linear divide-and-conquer — tells you to account for the branches rather than assume a single series path, so that when a rung has parallel contacts or a seal-in branch, you recognize a point reading 24 volts may be fed by another branch and you track which paths feed each point, applying the divide method to the relevant path and considering which branch should be active, which adapts the divide-and-conquer technique to the real rungs that have parallel branches rather than a simple single line.
Divide and conquer as your core skill
To close, it is worth recognizing that divide and conquer is the core diagnostic skill of the whole book, because mastering it equips you for the largest class of faults. The dead circuit and the open — the most common faults — are found by divide and conquer, and the method’s logic (halving the search, cornering the fault between last-good and first-bad) underlies efficient fault-finding generally. A technician who has truly mastered divide and conquer can find an open in any circuit efficiently, which is a large part of control-circuit troubleshooting. So divide and conquer is the core skill, and mastering it is central to becoming a capable troubleshooter. Understanding divide and conquer as your core skill — the method for the most common faults — equips you for a large part of troubleshooting. Understanding divide and conquer as your core diagnostic skill — the method that finds the dead circuit and the open, the most common faults, and whose halving logic underlies efficient fault-finding generally — equips you for the largest class of control-circuit faults, so that mastering it (halving the search, cornering the fault between the last-good and first-bad point) makes you able to find an open in any circuit efficiently, which is central to becoming a capable troubleshooter and the reason the dead circuit’s method deserves to be practiced until it is second nature.