Replacing a failed PROFINET device is one of the most common
maintenance tasks, and getting it right — above all, handling the device
name correctly — is essential, because the single most common reason a
replaced device will not run is that it has no name. Understanding the
replacement procedure, with its crucial naming step, lets you replace
devices reliably. This chapter covers device replacement the right
way.
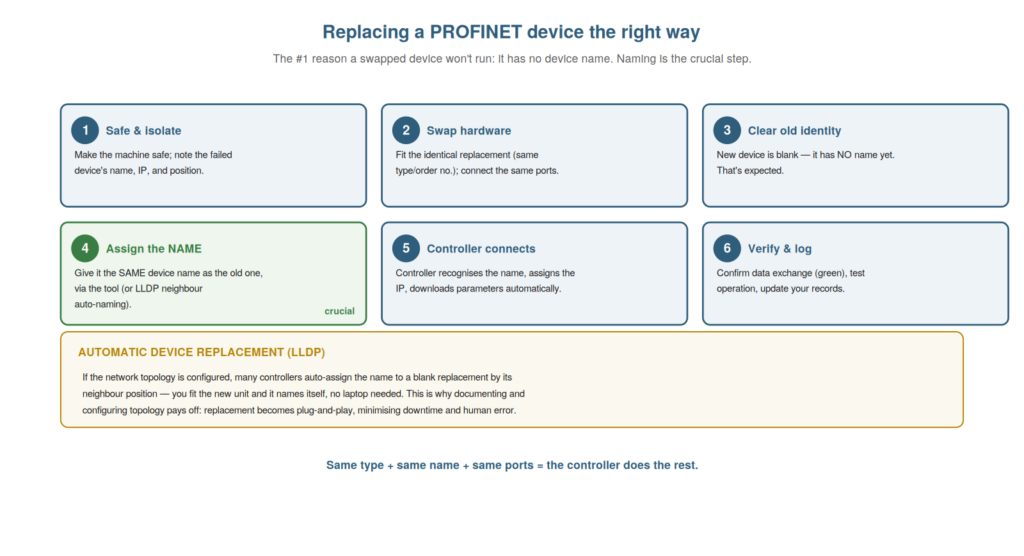
the identical hardware, recognise the new unit is blank (no name),
assign the SAME device name as the old one (the crucial step), let the
controller connect and parameterize, then verify and log. Same type +
same name + same ports = the controller does the rest.
The replacement procedure
Understanding the replacement procedure — the sequence of steps to
replace a device reliably — ensures a smooth swap rather than a puzzling
failure. The procedure: make the machine safe and note the failed
device’s identity (name, IP, position) before removing it. Swap in the
identical replacement — the same device type and order number —
connecting the same ports. Recognize that the new device is blank: it
has no device name yet, which is expected. Assign it the same device
name as the old device (the crucial step). The controller then
recognizes the name, assigns the IP, and downloads the parameters
automatically. Finally, verify the device is exchanging data (green) and
operating correctly, and update your records. So the procedure is: safe
and note, swap identical, recognize blank, assign the name, let the
controller connect, verify and log. Understanding this procedure ensures
a reliable replacement. Understanding the replacement procedure — the
ordered steps from making safe through naming to verifying — ensures a
smooth swap. It reinforces the procedure: make safe and note identity,
swap identical hardware, recognize the blank device, assign the name,
let the controller connect, verify and log. Understanding the
replacement procedure — making safe and noting the identity, swapping in
identical hardware, recognizing the new device is blank, assigning it
the same name, letting the controller connect and parameterize, then
verifying and logging — ensures a reliable device replacement, so that
you follow the steps that lead to a smooth swap, with the controller
doing the connection and parameterization automatically once the name is
assigned, which turns device replacement from a potentially puzzling
failure into a routine, dependable procedure.
Why the name is the crucial step
The single most important point about device replacement is why the
name is the crucial step, and understanding it prevents the most common
replacement failure. A new, replacement device comes blank — it has no
device name. Since PROFINET identifies devices by name, and the
controller finds each device by looking for its configured name, a
device with no name (or the wrong name) will not be found by the
controller and will not connect — no matter that the hardware is correct
and connected. So the crucial step is assigning the replacement the same
name as the device it replaces: only then does the controller recognize
it and proceed. This is why so many replacements fail: the technician
swaps the hardware correctly but forgets that the new device needs its
name assigned, and is then puzzled that the correct hardware will not
connect. Understanding that the name is what the controller uses to find
the device — and that a blank replacement lacks it — makes clear why
naming is the crucial, not-to-be-forgotten step. Understanding why the
name is the crucial step — that PROFINET finds devices by name and a
blank replacement has none — prevents the most common replacement
failure. It reinforces that a replacement device is blank (no name), and
since PROFINET finds devices by name, assigning the name is what lets
the controller recognize and connect it. Understanding why the name is
the crucial step in device replacement — because PROFINET identifies
devices by name, and a blank replacement device has none, so the
controller cannot find it until the name is assigned — prevents the most
common replacement failure, so that you never make the classic mistake
of swapping correct hardware and being puzzled when it will not connect,
remembering instead that the name is what the controller uses to find
the device and that assigning it to the blank replacement is the
essential, easily-forgotten step that makes the replacement work.
Automatic replacement via topology
A valuable feature that makes replacement easier — even nameless — is
automatic device replacement via configured topology, and understanding
it shows why documenting and configuring topology pays off. If the
network topology is configured in the project (the tool knows which
device connects to which neighbour on which port), many controllers can
automatically assign the name to a blank replacement based on its
position: the controller sees a blank device in the known position and
gives it the name that belongs there. So you fit the new device in the
same place, connected the same way, and it names itself — no laptop
needed, minimal downtime. This is why configuring and documenting the
topology pays off: it makes replacement nearly plug-and-play, reducing
downtime and eliminating the human error of forgetting the name. So
automatic replacement via topology is a strong reason to configure the
topology. Understanding automatic replacement via topology — the
controller naming a blank replacement by its known position — shows the
value of configured topology. It reinforces that configured topology
lets the controller auto-assign the name to a blank replacement by
position, making replacement plug-and-play, which is why configuring
topology pays off. Understanding automatic device replacement via
configured topology — the controller assigning the name to a blank
replacement based on its known position in the documented topology —
shows why configuring and documenting the topology pays off, so that
with topology configured, replacement becomes nearly plug-and-play (fit
the identical device in the same place and it names itself), minimizing
downtime and eliminating the forgotten-name error, which is a strong
practical reason to invest in configuring and documenting the network
topology as part of good PROFINET practice.
Matching the exact device type
A detail of replacement that prevents subtle faults is matching the
exact device type, and understanding why the precise type and version
matter avoids the mismatch problems a near-match can cause. A
replacement should be the identical device — same type and order number,
and often the same or a compatible firmware version — because the
project is configured for that specific device, expecting its exact
modules, data, and behavior. A near-match (a similar but not identical
device, or a different version) can cause a configuration mismatch: the
controller expects the configured device and finds a different one,
which may not connect or may misbehave. So matching the exact type
matters: the right part number ensures the device matches the
configuration. If an exact match is unavailable, a genuinely compatible
replacement may work, but this needs care to ensure compatibility.
Understanding the importance of matching the exact device type — to
match the configuration and avoid mismatch faults — prevents the subtle
problems a near-match causes. Understanding the importance of matching
the exact device type — the same order number and a compatible firmware
version, because the project is configured for that specific device —
prevents the subtle configuration-mismatch faults that a near-match can
cause, so that you replace a failed device with its exact equivalent to
match the configuration the controller expects, avoiding the connection
failures or misbehavior that result when a similar-but-different device
does not match the configured type, which makes matching the exact
device type an important detail of reliable device replacement.
Scenario: the replacement that wouldn’t run
A scenario shows the crucial naming step in device replacement. A
technician replaced a failed device with an identical new one, connected
it correctly, and was puzzled when it would not come online — the
hardware was right and connected, yet the controller would not recognize
it. He nearly suspected the new device was faulty. But understanding
that a replacement device is blank and needs its name, he checked and
confirmed: the new device had no device name. He assigned it the same
name as the failed device, and immediately the controller recognized it,
assigned its IP, parameterized it, and brought it online. The correct
hardware had simply lacked its name — the crucial, easily-forgotten
step. Remembering it resolved the fault. This scenario shows the crucial
naming step resolving a replacement that would not run. Understanding
that a replacement device is blank and needs its name let the technician
resolve a puzzling non-connection that was simply a missing name. It
reinforces that the crucial replacement step is assigning the name,
without which correct hardware will not connect. The scenario reinforces
the crucial naming step in replacement: the technician resolved a
replacement that would not run by remembering to assign its device name,
illustrating the single most common replacement mistake — forgetting
that the blank new device needs its name — and how remembering this
crucial step turns a puzzling non-connection of correct hardware into a
successful replacement, which is why naming is emphasized as the step
everyone forgets.
Verifying after replacement
A step in replacement that must not be skipped is verifying
thoroughly after the swap, and understanding what to verify ensures the
replacement is truly successful. After replacing a device and assigning
its name, it is not enough that it connects; you should verify: that it
is exchanging data (green, in RUN), that it operates correctly (the
actual function — the drive drives, the valve valves, the sensor
senses), that no new faults or warnings have appeared, and that the
machine as a whole runs correctly with the replacement. This thorough
verification confirms the replacement truly worked, not just connected.
Skipping it risks leaving a subtle problem — a device connected but
misconfigured, or a function not quite right — undiscovered until it
causes trouble. So verifying thoroughly after replacement — data
exchange, correct operation, no new faults, machine running — ensures
success. Understanding what to verify after replacement ensures the swap
is truly successful, not merely connected. Understanding the importance
of verifying thoroughly after replacement — confirming data exchange,
correct operation of the actual function, absence of new faults, and
correct machine operation — ensures the replacement is truly successful
rather than merely connected, so that you do not skip the verification
that confirms the device not only communicates but works correctly and
leaves the machine running properly, which catches any subtle problem (a
misconfiguration, a function not quite right) before it causes trouble,
completing the replacement with the confidence that it genuinely
resolved the fault rather than just appearing to.
Replacement as a routine to get right
To close, it helps to frame device replacement as a routine worth
getting exactly right, because its frequency makes reliable execution
valuable. Replacing a failed device is among the most common PROFINET
maintenance tasks, done again and again over a machine’s life, so
getting the routine right — the safe handling, the identical hardware,
and above all the crucial naming step — pays off every time. A
technician with the replacement routine down cold performs each swap
smoothly, without the puzzling failures that catch those who forget the
name. So it is worth internalizing the replacement routine until it is
second nature: safe, swap identical, assign the name, verify. This
reliable execution of a frequent task saves time and avoids the common
replacement failures. Understanding replacement as a routine to get
right — internalized until second nature — makes a frequent task
reliable. Understanding device replacement as a routine worth getting
exactly right — the safe handling, identical hardware, crucial naming,
and verification, internalized until second nature — makes a frequent
task reliable, so that because you replace devices again and again over
a machine’s life, having the routine down cold lets you perform each
swap smoothly without the puzzling failures that catch those who forget
the name, which makes internalizing the replacement routine a high-value
investment that pays off every time you perform this common and
important maintenance task.