This chapter builds one of the mental models that everything else in electronics depends on. One current path means the same current passes through each element.
The core ideas are straightforward when separated. One current path means the same current passes through each element. Resistances add. Voltage drops divide across the path. One open can stop the whole path.
Keep definitions separate from equations. A definition tells you what a quantity means; an equation tells you how quantities relate in a particular model. Real parts have tolerances and real sources have internal resistance, so small differences between calculation and measurement are normal. Large differences deserve an explanation.
Try reading the schematic as a story: energy enters, a condition changes, and the circuit produces a response. In practical work, this means you should be able to describe what you expect before you connect power.
A concrete example makes the idea easier to test. 1 kΩ and 2 kΩ in series across 9 V carry 3 mA and drop about 3 V and 6 V. Do not treat the numbers in an example as universal values; use them to learn the method, then check the ratings and datasheet for the actual parts on your bench.
A formula worth keeping nearby is: Rtotal = R1 + R2 + …. Write units next to each value before substituting numbers. Unit errors and decimal-place mistakes are often much larger than component tolerance.
Focus on this point: one current path means the same current passes through each element. Ask what you could measure to prove that statement in a real circuit. If the expected behavior is present, move to the next block. If it is absent, stay at that stage until the reason is understood.
The phrase “resistances add” also has a troubleshooting meaning. Consider the failure modes that would make the quantity too high, too low, stuck, noisy, or intermittent. Learning normal behavior and failure behavior together makes the concept far easier to remember.
Focus on this point: voltage drops divide across the path. Ask what you could measure to prove that statement in a real circuit. If the expected behavior is present, move to the next block. If it is absent, stay at that stage until the reason is understood.
The phrase “one open can stop the whole path” also has a troubleshooting meaning. Consider the failure modes that would make the quantity too high, too low, stuck, noisy, or intermittent. Learning normal behavior and failure behavior together makes the concept far easier to remember.
Do not chase precision before you have correctness. First confirm polarity, connectivity, supply voltage, approximate current, and the correct component value. Once the circuit behaves in the right direction, smaller effects such as tolerance, temperature, noise, and measurement loading become worth investigating.
One final bench habit is to keep a last-known-good state. A quick photo, sketch, or table of expected voltages gives you a reference after later changes. This simple habit turns many future faults into comparisons instead of mysteries.
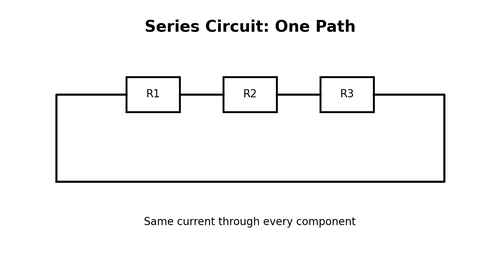
Worked Example
1 kΩ and 2 kΩ in series across 9 V carry 3 mA and drop about 3 V and 6 V.
Formula to keep nearby: Rtotal = R1 + R2 + …. Put units beside every number before calculating.
Hands-On Mini-Lab
- Write the key quantities or states on paper before building anything.
- Choose a safe low-voltage example that demonstrates the idea.
- Calculate or predict at least two values before powering the circuit.
- Measure the real circuit and compare the results with the prediction.
- Explain any difference that is larger than normal tolerance or meter error.
Common Beginner Mistakes
- Measuring without first deciding what result is expected.
- Changing several variables at once.
- Mixing units such as ma and a.
- Treating a simplified model as an exact description of every component.
Fault-Finding Lens
- Start by verifying the power source and the actual supply voltage at the stage you are testing.
- Check the physical connections and polarity before assuming a semiconductor or IC has failed.
- Use the chapter model to find the last point that behaves normally and the first point that does not.
- If the result is ambiguous in circuit, isolate the stage or component and repeat the test with a known reference.
- After correction, reproduce the original operating condition and confirm that current, voltage, temperature, and function remain normal.
Check Your Understanding
- Explain series circuits in your own words without using the diagram.
- Which measurement would give the quickest evidence that this circuit or concept is behaving normally?
- Name one beginner mistake that could create a misleading symptom.
- What would you test next if the measured value were much higher or lower than expected?
- How could you demonstrate the key idea with a safe low-voltage experiment?
Key Points
- One current path means the same current passes through each element.
- Resistances add.
- Voltage drops divide across the path.
- One open can stop the whole path.